Showing posts with label summer. Show all posts

Friday, July 25, 2014

sand prints

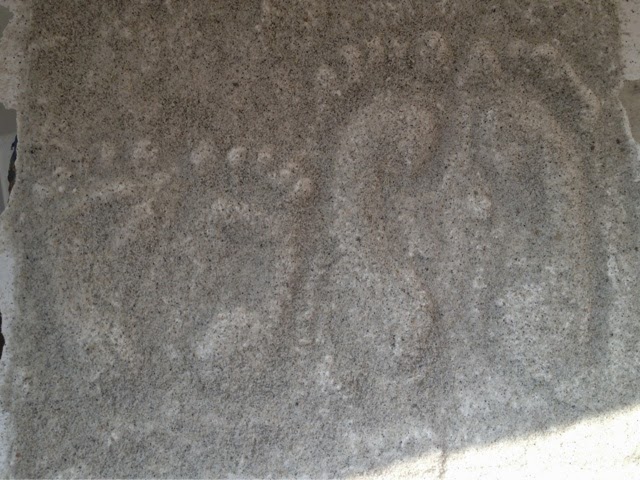
I will preface this post by saying that, in my opinion, this idea sucks. You will not find instructions on how to make adorable sand footprints here because I failed at it 5, count them, 5 times. Don't get me wrong, those who have successfully done this have a beautiful little keepsake hanging on their wall. I would love for one of those moms to come to my house and make one of my childrens' feet. 

This is a photo of the best of my five attempts. It actually looks better in this photo than it does in person. 

I had a number of problems over the course of five of these. I had cracked plaster, feet with no toes, sand that was too dry then sand that was too wet. I cannot tell you how to successfully do this but I will tell you the theoretical process. I will never, ever attempt this again so if you try it and are successful send me a note giving some hints and I'll post them. 

You need sand, plaster, a clear sealant spray, and a picture frame. 
Remove the glass from the picture frames and put the back of the frame in backwards. 
Fill the frame with sand and have your kid(s) make footprints. Here's a photo of that step. 

Smooth out the sand around the prints and cover in plaster. 
Let it dry completely then flip frame over carefully to remove plaster and sand. 
Brush excess sand off and spray with sealant. You can also add shells to make me really jealous. 

All in all, I wouldn't recommend this at all if the end result wasn't so cute. It's messy and the only interactive part for kids is making the footprint, which isn't much fun. I won't be trying it again but good luck to you if you try it!


Monday, July 7, 2014

ice bowl

Poor little G hasn't had much of a role on this blog yet. She's tried a lot of the infant activities M did at her age but to blog about them twice doesn't make much sense. This is a new variation on a few other things we've done (ice boats, ice painting, etc) and was great for a hot day. 
G was a bit more reserved about this than I expected. I gave her 4-5 colored ice cubes in a glass bowl of water. She batted at them, picked them up but quickly let them go, and splashed a bit. She also seemed to notice and watch the color melting off the cubes into the water. Needless to say this activity needs your undivided attention. G actually never tried putting the ice in her mouth but I was pretty shocked by that. 


On another note, I have labeled every (or close to it) blog entry with the age M or G was when we did it. You can easily search labels for a specific age if you'd like :)

chalk bombs

I think I've pinned this idea at least three times over the past year or so.  M was super excited and loved this so much.  Our chalk paint wasn't super bright but I'll explain that...

The idea of a chalk bomb is a water balloon filled with chalk paint.  There are a number of ways to make (or buy) chalk paint.  We made our by crushing chalk and adding water.  In theory it would have worked great because it was super bright and thick.  The trouble came with getting it into the balloons.  We only had super small balloons so that didn't make it any easier.  I attempted an eye dropper and a spray bottle but neither were forceful enough to get the balloon to expand and allow more than a little bit in.  I ended up filling it as far as I could then adding water.  It definitely diluted the "paint" but it still worked.  We had about 12 yellow, blue, and red bombs -

M loved throwing them.  He typically squeezes water balloons until they pop all over him so he needed some direction to throw away from him and he did well.  

Our paint wasn't super bright and was actually brighter once the splatters dried up.  This was really fun though and we will definitely be trying it again with better balloons and/or a better filling method.


windsock

M and I have made a windsock before using construction paper.  This windsock was different because we used a can as the base.  It made it a lot sturdier and allowed for M to gob on the paint.  We needed a summer-y/4th of July decoration and this was perfect.  We used a baby formula can as the base, peeled off the label and painted it with red, white, and blue paint.


Once it was dry we used a star-shaped sponge to make white stars around the can.  My intention was to use party streamers as the tails but, of course, there were no blue or red streamers to be found at Target that day.  We improvised with tissue paper cut in strips.  The shades were a bit darker, which ended up matching our half-mixed paint on the can pretty well.  Finally, I punched a hole in the top of the can and used a pipe cleaner to make a hook to attach the string to.  Happy 4th!


Tuesday, September 3, 2013

end of summer

This week is the last week before I go back to work.  It's also the last summer vacation week (ever) that will be just M and I, as the countdown to Baby G is at about 7 1/2 weeks.  We've had a fun summer and I haven't had a chance to blog all the fun things we've done.  I thought I'd use this entry to add some activities that haven't made the blog yet.  Even though I've made my best effort to make lots of beach, park, and outdoor activities happen, the bottom line is that we've had lots of indoor fun this summer thanks to this pregnancy.  Putting it in writing now so I don't forget in the (long-shot) chance of #3 coming along: a June baby pregnancy is much more weather-friendly than an October baby pregnancy.  Bring on the fall!

Cardboard caves-
M loves tunnels.  Driving through one is especially exciting but since we don't have a whole lot of tunnels around here, he likes making them for his cars, trucks, and trains.  This idea came from M's dad, who saw it on PBSkids.org.  We simply cut a few tunnels out and added some decor.  I could have spent $100 on a Thomas set but I didn't.


Five Little Firefighters book-
This one admittedly took much more effort on my part than M's.  However, I love how much this child loves books and I love how excited he still gets to read his book so we made a second handprint book about firefighters, another of M's favorite topics.  Another thing I love about these books is that they're made up of handprints that won't be that little for long :)
The Five Little Firefighters poem and book idea came from this great website.  The poem is as follows:
Five little firefighters sleeping in a row.
Ring goes the bell, down the pole they go.
They jump on the engine and put out the fire.
Now they're back home, safe but tired.
We love rhyming poems/stories because after two or three readings M gets really good at finishing the rhymes.  He loves "reading" himself.  Here's our version:


Baby G's lamp - 
I posted about the various DIY projects we did for G's room.  At the time, I mentioned needing an idea for a lamp.  I really love the Pinterest-inspired lamp I made for M's room and wanted something just as cute.  This is another Pinterest-inspired lamp shade idea from a Disney-sponsored website.  
G's room theme is moons and stars in yellow and light purple with a bit of gray.  I traced stars on contact paper and then stuck them to a white lamp shade.  Then I used cosmetic sponges to sponge the paint around the stars.  The paint was watered down to help it absorb better to the lamp shade.  After it dried, the contact paper was taken off.

In addition to DIY pieces for the nursery, I did a lot of Etsy shopping.  As soon as we found out G was a girl, one of the first items I ordered was a letter G for her bedroom door from the Etsy shop, Posh Dots.  When M was born I ordered an M for his door to match the teddy bear theme of his nursery.  Even though his room has since transformed into a sports-theme, his teddy bear M still hangs on his door and will until he makes me take it down.  Here are the M and G, both custom orders, both done exactly how I had hoped:


Thursday, July 18, 2013

M's top 5 travel activities

We recently went on a road trip to Philadelphia.  It was M's first big trip in the car longer than a couple hour (it took around 6).  I packed an activity bag for M.  Some things were regular toys and some things were activities I made.  I googled a lot of "traveling with a toddler" type phrases in the weeks before we went so I thought we'd add to the info that's out there by listing the top 5 things that kept M busy at just over 2 years old....

#5
By the time we got to New Jersey M had done an amazing job in the car but I could tell he had a little extra energy to get out by then.  This is about as simple as it gets....a block of styrofoam, golf tees, and a toy hammer.  He loved it....


#4
M's favorite toys are trucks, trains, and buses.  This was no different in the car.  He was happy to drive some small trucks around his car seat.  At home M usually chooses to play with larger trucks (like his Little People bus) but I put some smaller ones away about a week or so before.  He hadn't seen them in a while which made him happier to play with them.

#3
One of the blogs I came across while searching for ideas offered this color game that I knew M would love.  He loves little figures and putting things into other things.  These wooden peg people and cups (I think the label called them candle holders) are fairly cheap at craft stores.  I painted them one day and gave them faces with a marker.  M loved putting them in their cups (or "houses" as he called them).  He's pretty solid with his colors now but it served as a good color activity too.  The picture isn't great but it gives you an idea...


#2 Books and Movies
I bought a few brand new books M had never seen before, which were great for both the car and at night in the hotel.  M is not huge on TV or movies.  Don't get me wrong, he loves a good Caillou episode and is in love with the Toy Story movies.  However, if it's on in our house, he's usually playing, catching a glimpse now and then, but never really glued to it.  That being said, the iPad, loaded with movies and various videos ripped from Youtube, was a great thing to have.  While I continue to promise to never be a parent who has a full time screen in their vehicle, it was definitely a must for a trip like that.

#1
My child has amazed and surprised me countless times in the last two years.  This road trip was no exception.  The thing that amused M the most and that he enjoyed most was sitting in his car seat and looking out the window.  He loved all the trucks and buses on the highway.  He loved going under all the bridges in New York and calling them tunnels.  He even loved sitting in traffic on the New Jersey Turnpike and watching the "diggers" doing construction.  He turned out to be an awesome traveler.

* I didn't want to buy much for this trip but we did purchase this travel tray at Babies 'R Us.  While there are definitely things I didn't love about this particular one, something like it is definitely a must for a long trip.  So glad we had it.

Friday, June 21, 2013

ice boats

We celebrated the first day of summer today with ice boats in our kiddie pool.  This activity was a huge success with M and one that we will definitely do again.

Directions:
- Tape the short end of a flexi-straw to the bottom of a Solo cup so that the tall end stands up straight in the middle of the cup.
- Fill the cup 1/3 of the way with water and freeze (ours froze overnight).


- Once completely frozen cut the cup away from the straw.  I also read that you could loosen the ice by running warm water on the outside of the cup but I found it pretty easy to just cut the cup and slip it right off.
- Use a hole punch to make a sail for each boat.  We used construction paper.  After the fact I thought it would be cute to have had him decorate the sails but they get wet and ruined fairly quickly.

M was really excited to put them in the water and we liked sailing them back and forth and sending them down M's pool slide.  As I said, the sails were soaked within a minute or so and slumped but M didn't care and eventually just pulled them off.  The straw was great because he could use it to move the boat around without grabbing the ice every time.  

The weather wasn't overly hot today but warm enough for this activity.  That was probably in our favor because I could see these melting super fast on a very hot day.  Ours lasted maybe 10 minutes each today.  I made two and we played with one at a time because, of course, after the first melted M was asking for more.  M actually seemed to enjoy them most once they melted a bit and were smaller.  He's a big fan of throwing things (balls, rocks, etc.) into water so he had tons of fun throwing the smaller ice chunks into the water then finding them.  This was a great activity for summer and one that definitely gave me some ideas for other things to try this summer!


Friday, May 31, 2013

ice cream in a bag

We haven't posted too much lately but summer is coming (seems like it's here today) and M and I already have a long list of fun activities to try in the coming weeks. 
Today we experimented with making our own ice cream using the Ice Cream in a Bag recipe. We used the one from the Disney website but Googling "ice cream in a bag" brings up plenty. 
This is the process:
Mix 1 cup of Half and Half, 2 tablespoons of sugar, and 1/2 teaspoon of vanilla extract in a ziploc bag. In a larger (ours were actually the same size) ziploc bag fill 1/2 way with ice cubes and add 1/2 cup of salt. Then shake the whole thing for about 5 minutes. 

Obviously I prepared it but M enjoyed both shaking the bag and dancing to the sound when I shook the bag. It was a little on the heavy side for him but he managed. 

Ours was done in a little less than 5 minutes. It's pretty easy to tell when it's ready. On the website of one of the recipes I read it showed children eating the ice cream right out of the smaller bag. We put ours in a bowl and added sprinkles because the inside bag comes out covered in salt. I wasn't a huge fan of the taste (maybe less vanilla extract if we do it again) but M liked it!  One other thing- as you can see in the picture it melted rather quickly after coming out of the bag. M didn't mind but I imagine it would melt super fast outside on a hot day. 

Friday, August 31, 2012

water painting

I was planning to save this idea for next week but with today's warm weather I decided we'd try it. We've painted a few different ways now. M has used a paintbrush before (see our garden pets entry). Water painting was a great way to let him practice more with a paintbrush and to cool off a little in the warm weather.
We used water, a few paintbrushes, and construction paper for this activity. Basically M "painted" the construction paper with the water instead of paint.  For the first 10 minutes M was happy to stir the water with his brush.

Once he got the hang of it he had fun.  We even made some hand prints after M stuck his hand in the cup.  He made a lot of dots and splatters.

The neat thing was the construction paper held up to a lot of water.  Even when the cup was dumped on one piece.

I'll admit I failed at this project in the beginning.  We first tried this on our porch (bad idea, wet carpet) with a rather full cup of water (um, not sure what I was thinking).  Much better out on the deck with a half-full cup.  It was plenty of water until it got dumped.  However, I think the dumping just made it more fun for M.  You can do this on pavement or wood surfaces too - basically anywhere that water will show up darker.  


Thursday, March 22, 2012

water bowl

This week was incredibly warm for our area so I was trying to think of some fun ways for M to cool off.  M loves water unless it comes in the form of a public pool (I have no explanation for that aversion) so I filled up our biggest bowl, added some toys, and plopped him down on a beach towel on our porch. 
There was a whole lot of splashing...
and by the end of 15 minutes, no water left in the bowl and a happy baby...


Why we loved the water bowl....
baby: lots of splashing and playing with toys
mommy: promoting fun in the water

M's age when we played: 9 months, 1 week