Friday, October 26, 2012

tape paint

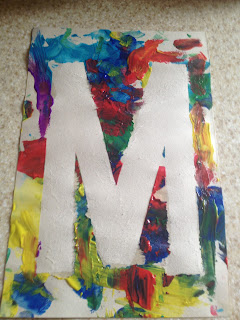
It seems that with our new schedule Friday has become our activity day.  Today we tried tape painting. It was one of our most successful activities so far based on the amount of time we spent doing it and M's sadness at having to clean up.

To tape paint you need tape, paint, and paper.  When I first read about it they suggested using finger paint.  We used a brush and it still came out well.  To start make a tape design on the paper.  Letters are easy.  Things with straight lines are easiest.  We did an M.

We used painter's tape and construction paper which turned out to not be the best combination but more on that later.  Once the tape is on you can start painting.  M loved painting today.  He painted the paper...

And I realized this child has had his hand painted for handprints too many times...

We talked a lot about colors while we painted.  M knows the words blue, green, and purple but isn't always right on when matching the words to the colors.  We did one color at a time and I let M choose which ones he wanted to use.  We set up the bottles and he either said what he wanted or pointed.  He was really into it.  Here's what it looked like when he finished:

After a while I peeled off the tape.  This is where the combination of painter's tape and construction paper kind of messed us up.  The painter's tape kind of stuck too much and pulled off some paper with it (if that makes sense).  I think next time Id either use masking tape with the construction paper or a stronger paper with the painter's tape.  It did come out cute though:

I've mentioned these paints before and I have to say how much I love them once again.  They were fabulous for this and wiped right off of M, his socks, his booster seat, and the plastic table cloth on our table.  Love them.


Friday, October 19, 2012

fall art

This morning M and I got into the Halloween spirit with this ghost handprint.


We made two, one to hang up and one to bring to M's great-grandmother.  I don't have any pictures of the process because I had one hand on the paint and the other on M's painted hand.  It's fairly simple.  You need white paint (we used our favorite very washable Crayola paint), black construction paper, and a black marker.  We used googly eyes but you could draw the eyes on.  M is getting good at handprints but if I was doing this with an older child I would tell them to keep their thumb down so it's closer to the other fingers.

Last week we did another fall picture that M loved (I haven't had a chance to post it).  I made a brown tree on construction paper:

M filled in the autumn leaves.  We used what I call "paint dotters" (bingo daubers, poster paint, felt tip paints, etc).  M loved these.  They were super easy for him to hold and use...

The downside was that they weren't very easy to clean off of his hands.  We needed SOS but it did come off.  Finished product...


Monday, October 1, 2012

miscellaneous fun

M's daddy was in Chicago this weekend for the Ryder Cup so we tried a few little quick activities over the course of the weekend.  Some were more successful/fun than others but I thought we'd post a bit about each.

Pipe Cleaner Strainer
I'd seen this idea on various blogs and websites I've visited.  You fill the holes of a strainer with pipe cleaners.  It's supposed to be fun to pull them out then try to put them back in.  I say "supposed to be fun" because M found the first part much more entertaining than the second.  He'd never used pipe cleaners before so he had a lot of fun taking them out and inspecting them.  He didn't have as much interest in trying to put them back in.  He found it much more fun to chase the dogs with them.

Sticker Collage
M's had a little experience with stickers in the past but I've never given him a whole sheet of them before.  Nonni brought us some pumpkin stickers so we used them to make a Happy Halloween sign.  At first M was mad when he stuck the stickers to the paper and couldn't get them back off but eventually he got the hang of it.  The trick at the beginning turned out to be providing him with a new sticker as soon as the first was on.  Here's our final product:

Color Sorting
This is my free version of this $30 activity.  M has started to recognize colors, especially when we color with crayons.  I set up three pieces of construction paper (yellow, blue, and red) and we used some of his magnetic letters of the same colors to sort.  M watched me do it then tried it:
To his credit he did do a few on his own.  However, the activity ended shortly after like this:

Card Books
This last one is another mom idea from Pinterest.  If you look for it you'll find a variety of ways to bind together greeting cards into keepsake books.  I am not one to hold on to cards.  I probably have less than 10 saved cards (for me) but I've kept every card M has gotten.  They've been in a box, which seems like a waste, so I took out his first birthday cards and the cards we received right after he was born and made two card books for him.  I found these small 3-ring binders at Staples, which worked great for the cards.  However, if there is such a thing as a small 3-hole punch, I don't have it.  So I ended use a single hole punch to put the cards into the binder.  It was a little more time consuming but it didn't take me more than an hour to make both books - and we had a lot of cards.
Before:
After: