Thursday, June 21, 2012

ice cube painting

Today M and I tried painting with ice cubes.  It was a great activity for this week since the weather has been so hot.


To make the "paints" I mixed water with food coloring and then froze it in an ice cube tray.  Putting sticks into the cubes keeps the mess down (less on hands) and makes it easier to paint with the cubes because you don't need to hold them.  Popsicle sticks would be good.  I didn't have any so I broke wooden skewers in half and used those.

M loved this activity.  He had no problem holding onto the sticks and had good control over the cubes. He didn't want to stop and I had to pry them out of the hands when they had melted too much. 

When we do this again I'd do it outside in the shade.  Although with a younger toddler like M the high chair was great for containing the mess.  I'd also keep some of the cubes in the freezer and take them out as the others melted.  On a hot day they melt quick!

M's age when we played: 12 months, 1 week


Friday, June 15, 2012

sensory bottles

This is something I've wanted to try with M for a few weeks.  I was thinking of waiting until we moved because a lot of our art stuff is packed but today I gave it a try anyway.  If you Google "sensory bottles" you'll find lots of different ideas for different ways to make these.  You need empty bottles, some food coloring, and some fun stuff to put inside of them.  M loves shaking bottles or cups (or anything that makes sound) so this was a fun activity for him.  He also enjoys anything that rolls and you can bet he figured out that these roll pretty quickly.  We made three today.
This one was the first one we did and it's my favorite.  It's water, oil, glitter, and some green beads.  I started with only yellow food coloring and then decided to add some blue to turn it green.  The oil is yellow and the water is green which gives it a really cool look when M shakes it or turns it upside down.  I didn't fill any of our bottles to the top because M likes to make noise and full bottles are a lot quieter than ones with a little space left over.
This one is water, dish soap, red food coloring, and the rest of the beads we had.  The more you shake it the more suds it makes.  M loves it.
For the last one we did purple water with a bunch of Tubettini macaroni.  This one requires a little extra oomph to get the macaroni really moving.  It's nice because it makes M work a little harder than the others.
If your child is like mine you'll want to give the caps a little extra reinforcement.  I used packing tape but any stronger tape would work:
As I said, there are a ton of possibilities for these.  I opted to fill all of them with liquid because M already has some containers with dry macaroni, beans, etc. that are used as noisemakers.  But an empty bottle with some beans or something similar would be a fun one as well.  I also came across some quieter options like a bottle filled with colored feathers or those little soft pom pom balls.  I think we'll definitely end up making more of these in the future.  It will be fun when M can participate in filling them and coming up with ideas for what to put inside.  

M's age when we played: 12 months


Monday, June 11, 2012

Very Hungry Caterpillar birthday party

M turned one on Sunday and his party had the theme of The Very Hungry Caterpillar.  I made a bunch of decorations, most of which I found online through Google searches or Pinterest.  I thought I'd put them all here for people like me who wish they could have found everything in one spot.  I'll also link to the original source, if there is one.

My favorite decoration was the giant tissue paper caterpillar we hung over the dessert table.  I think it was M's favorite too- he'd point to it while he ate his breakfast every morning as it hung in our kitchen before we moved it to Nonni's house for the party.  This was the most intricate of all of the decorations but after making one or two balls you get the hang of it.  I started with the head but I'd recommend starting with one of the green ones, because I think they got better as I went.  The original tissue paper caterpillar is here and the instructions for making the balls are here.  I love how fun he is and would totally hang this in my classroom down the road...even though there will probably be fun-sucking fire rules against it.

Another of my favorites were these flower pots for the utensils.  We traced quarters for the caterpillar circles then painted them.  I almost wrote "Happy Birthday M" on them but I decided against it since I figured I'd end up either using them at school or putting flowers in them.  M's Nonni gets the credit for this idea.

We didn't do goody bags but gave the kids who came bubbles instead.  These bubbles are from the dollar store (they blow great bubbles too).  We took the labels off and made our own.


The next caterpillar was made of construction paper circles and had different photos of M on each circle.  The original decoration is here.  We made ours crawl around the doorframe.

These were construction paper circles linked with ribbon.  They hung a little funny by themselves so I used double sided tape to keep them straight.  I'm thinking if you used a stronger material than construction paper they might hang better.

This sign was for the front of M's high chair...obviously try to position so that antenna doesn't get ripped off, oops.

I found my cake idea here.  It's a sheet cake on the bottom and the caterpillar is a bundt cake cut into pieces.  That was the trickiest part.  I cut it into thirds but had to do some filling of spaces with frosting. I'm still not sure exactly how you're supposed to cut the bundt cake but I was really happy with how it came out.  Dots and eyes are M&Ms.  Feet are Hershey kisses cut in half.

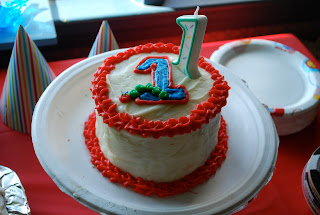
 M also had a "smash cake" - two 8-inch round cakes cut smaller (maybe 4 inches?).  Here are the before and after shots:

And these were our invitations.  Made with Photoshop....


Tuesday, June 5, 2012

sticker hands

A quick little problem solving activity for M this morning....removing stickers from the backs of his hands.  He loved the bright star stickers and didn't mind having them on his hands but (of course) wanted them off so he could play with them.  The first one took him a few minutes to figure out.  He knew he had to pinch it but kept missing the edge.

Once he got the first one off the second one was easy.  And once he unstuck the second one, he stuck it back on (it's still there).
Quick and easy if you have stickers at home.  Good for pincer grasp and fine motor development.

M's age when we played: 11 months, 3 weeks

Friday, June 1, 2012

bowl of jello

The idea for today's activity came from here.  I read about their Gelatin Sensory Tub and wanted to try it. I thought about a slightly different take on it by trying to make jello "blocks" to play with.  I put my jello in ice cube trays to form but the pieces ended up being more floppy that I thought (I guess it's been a while since I've had a jiggler).  We ended up with a sensory tub instead of blocks but we had a lot of fun. The mom on No Time For Flash Cards had a much more appealing array of jello.  We had two colors.  M didn't seem to mind though.
We poked it....
Scooped it....
Squashed it...
M had a lot of fun.  He got to practice holding and handling a spoon (even though he didn't eat any jello).  He also got to practice picking up some not-so-easy-to-handle jello chunks.  We've done a lot of activities that have allowed M to practice his grasp and fine motor skills.  The other day he took one of those small lipstick cases out of his grandmother's purse, opened the button clasp, took out the lipstick, fit it back inside, and buttoned it.  We were kind of impressed.  That's why we do these kinds of crazy things :)
A few tips- make sure you and your child are not wearing anything you don't want ruined.  Even if you don't plan on touching the jello, you will end up with it on you.  Do it on a surface that could be easily hosed down, wiped down, or thrown away.  We used a plastic table cloth.  And finally, only do this if you can handle a mess.  M needed a bath afterwards and anything he inadvertently touched on the way to the tub turned instantly sticky.  Messy but fun.

M's age when we played: 11 months, 3 weeks