Showing posts with label mommy project. Show all posts

Thursday, June 20, 2013

baby G's rug (in progress)

In October M will have a co-star on our blog, his new sister G.  We're just starting to get things ready for G's room and Pinterest is providing lots of great (potential) ideas.  The first attempt I'm making at a DIY item for her room is a rag rug.  There are lots of examples out there but this blog, DIY & Crafts, was the site that provided my inspirational pictures and instructions.  I think the one this mom made is adorable.


In theory, a "rag rug" is supposed to be made of old clothes or other materials you don't need anymore.  I loved the idea of using old baby clothes but Baby G's room colors are yellow, gray, and light purple.  M's old wardrobe pretty much consists of blues, reds, and greens so that didn't really work out.  M and I went to Joann Fabrics and bought material instead.  I've never bought fabric for anything in my life so it was an interesting experience that included picking up and putting back at least ten different fabrics.  I settled on a really soft cotton.  The only downside is that the edges fray a bit when it's cut.  I'm not anywhere near enough of a fabric expert to tell you what kind of material might not do that though.

One of the problems I had was figuring out how much material to buy.  I read various blogs and blog comments from people who had made them and found a lot of different answers.  I ended up buying three yards of each color.

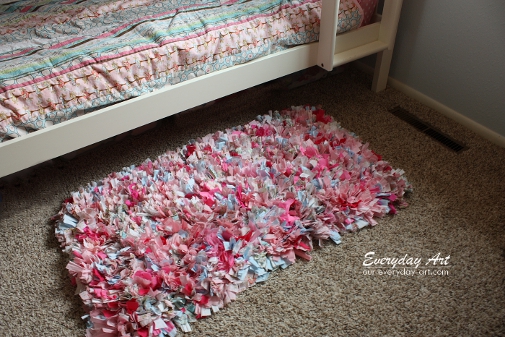
Here's my warning on this project: it's very time consuming.  I've been working on it about one week and I've maybe put in four hours total of work on it.  Here's the current progress:

At least I have 18 weeks left.  The bottom is a non-slip rug mat you'd use under an area rug.  The only thing I'm doing differently than DIY & Crafts is tying the pieces instead of leaving them loose.  The piece of rug mat I bought is about 3 feet by 5 feet.  We'll see if the whole thing gets done or if it gets cut down.  This blog will be updated when it's finished, hopefully before October 24th.

-----------------------------------------------
UPDATE: 6/25
I've gotten through the first 9 yards of fabric and ended up with about 3 feet by a little over 1 1/2 feet of finished rug.  

UPDATE:  Read about the finished rug here.

Saturday, April 13, 2013

abc book

M has been getting into the ABCs. We've always had a big foam alphabet mat on the floor in his toy corner of the basement. When our dog Skippy had back surgery and couldn't walk on our hardwood floors we had to use a alphabet mat to make him a path through the kitchen. M will try saying the letter names as he walks on it or he'll pull one right out and try to tell me what it is.

One of our first posts on this blog was about M's people book, a simple little photo album with pictures of his family and friends and labels of their names. That's always been one of his favorites. He loves looking at photographs and I've made him various other albums that are "his" that he can pull out to look through. Our newest book is an alphabet book of M's favorite things (and a few people). It's mostly people but also includes some coloring book pictures or magazine pictures (some of those letters are tough!). The most important part is that each picture is of something M can quickly recognize and say the word for. This way, when we look through it I can say, "Z is for..." and he can be part of the reading by saying "zebra."

I bought another cheapie photo album and a pack of scrapbooking letter stickers bringing the cost of this project to probably about $5. M loves it and even though its not done (X ideas welcome, as M doesn't know X-rays yet), we've "read" it several times since yesterday.

Here is a sample page, T is for Thomas:


Monday, February 11, 2013

magnet cut-outs

This is basically a mom project but M has enjoyed playing with the product so I'm including it here.  I originally intended to make some of these magnet cut-outs of friends M doesn't see all that often.  He loves looking through his photo book and naming people he knows so I thought this would be fun for him too.  I haven't actually gotten to that point yet but I did make some of M and our immediate family. He loves pulling them off the fridge and putting them back on.


I started with these magnetic sheets.  They work just like the magnetic strips except they're 4x6 size so you could just attach a regular sized photograph to make it magnetic:

Next, I cut the picture down and cut a similarly shaped section of the magnetic sheet.  Then I attached it to the magnetic sheet.

I did end up wasting some scraps this way but since the backing of the magnets have one sheet on adhesive this was the best way I could figure to do it.  After the trimmed down photo was on the magnetic sheet, I cut around the people to make the cut-out.  Very easy and a big hit with M!

Monday, December 10, 2012

Santa ornaments

These ornaments might be one of my favorite crafts we've done so far.  This is kind of a mom-activity since M really didn't have much of a part except for lending his hand for tracing.  However, I bet older kids could try the painting or at least mix the dough.

This is another salt dough activity.  We used salt dough once before.  You basically need one part salt to two parts flour and then about the same amount of water as salt.  For example:
2 cups flour
1 cups salt
1 cup water*
I ad the asterisk because I usually add the water gradually based on the consistency.  For this I only used a 1/2 cup of flour to a 1/4 cup of salt.  We ended up with three ornaments.

The first step is to trace your child's hand and then cut it out.

Mix the ingredients for the salt dough then knead it until it's mixed.  Roll it out flat and use a sharp knife to cut hands using the traced handprint.  I added the holes using a plastic straw:


Let them bake at a low temperature (we baked them at the lowest temperature our oven would go which was around 200 degrees) for one hour.  I flipped ours once so they baked for 30 minutes on each side.

After they come out paint them so that the four fingers are Santa's beard and the thumb is the long part of his hat.  Add a string to hang it:

I wrote M's name and the year on the back of each.  I want to put something on them to preserve them a bit better but I haven't yet.  This is a super cute gift that doesn't cost much to make.  You could even add little tags to the string.  


Monday, October 1, 2012

miscellaneous fun

M's daddy was in Chicago this weekend for the Ryder Cup so we tried a few little quick activities over the course of the weekend.  Some were more successful/fun than others but I thought we'd post a bit about each.

Pipe Cleaner Strainer
I'd seen this idea on various blogs and websites I've visited.  You fill the holes of a strainer with pipe cleaners.  It's supposed to be fun to pull them out then try to put them back in.  I say "supposed to be fun" because M found the first part much more entertaining than the second.  He'd never used pipe cleaners before so he had a lot of fun taking them out and inspecting them.  He didn't have as much interest in trying to put them back in.  He found it much more fun to chase the dogs with them.

Sticker Collage
M's had a little experience with stickers in the past but I've never given him a whole sheet of them before.  Nonni brought us some pumpkin stickers so we used them to make a Happy Halloween sign.  At first M was mad when he stuck the stickers to the paper and couldn't get them back off but eventually he got the hang of it.  The trick at the beginning turned out to be providing him with a new sticker as soon as the first was on.  Here's our final product:

Color Sorting
This is my free version of this $30 activity.  M has started to recognize colors, especially when we color with crayons.  I set up three pieces of construction paper (yellow, blue, and red) and we used some of his magnetic letters of the same colors to sort.  M watched me do it then tried it:
To his credit he did do a few on his own.  However, the activity ended shortly after like this:

Card Books
This last one is another mom idea from Pinterest.  If you look for it you'll find a variety of ways to bind together greeting cards into keepsake books.  I am not one to hold on to cards.  I probably have less than 10 saved cards (for me) but I've kept every card M has gotten.  They've been in a box, which seems like a waste, so I took out his first birthday cards and the cards we received right after he was born and made two card books for him.  I found these small 3-ring binders at Staples, which worked great for the cards.  However, if there is such a thing as a small 3-hole punch, I don't have it.  So I ended use a single hole punch to put the cards into the binder.  It was a little more time consuming but it didn't take me more than an hour to make both books - and we had a lot of cards.
Before:
After:


Tuesday, August 21, 2012

hot wheels lamp

I've needed a lamp for M's room for a while but I haven't been able to find anything just right.  His room started with a bear theme.  As he's accumulated more stuff it's turned into a bear room with trains and sports and dogs and all kinds of other boy things.  At first I was looking for something that either had a bear on it or went with the mostly red/brown/beige colors in his room.  I widened my search and still didn't find anything I liked so I turned to Pinterest.  I've been trying a lot of DIY ideas from Pinterest lately and found some cute lamp ideas.  I decided to go with this one since M loves trucks and cars.  This would be an awesome project to do with a boy in first or second grade as a fun measuring activity.  I did our version slightly different from the original:


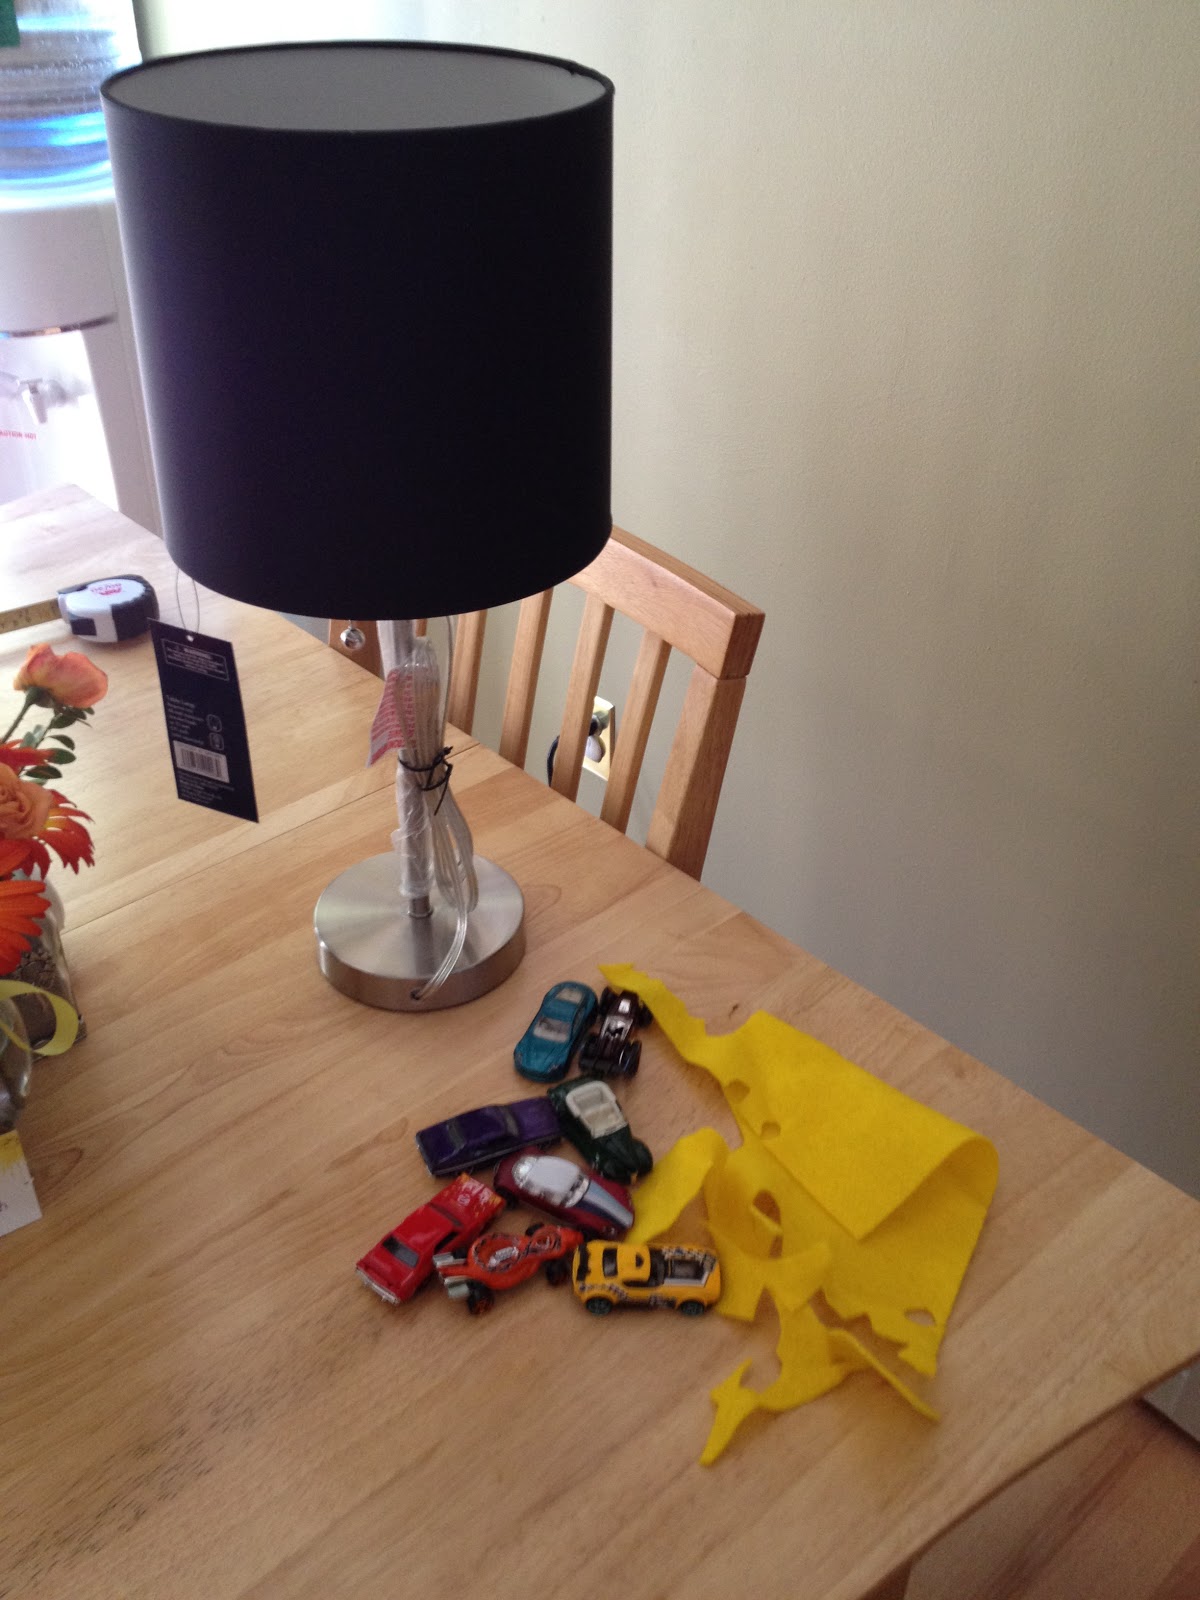
I went to Target and bought the lamp with the black shade and the matchbox cars.  We had some yellow felt left over from our felt board project.

I cut the yellow felt into one-inch strips and placed them one-inch apart on the lamp shade.  Our lamp shade was 28-inches around.  I attached them with hot glue.  

The cars were more difficult to attach.  At first I put hot glue on each wheel and stuck them on.  It didn't hold so I tried coating the whole bottom of the car in hot glue.  I held each car on for about a minute.  This seemed to work well.  There was one orange race car with a thin bottom that was more difficult than the others but eventually it stayed.  

I realize our blog has been missing a lot of "activity" type posts lately.  I have a few things planned that we'll try and share here soon.  But I love these projects and want to share them too!

Wednesday, August 15, 2012

scribble art canvases

Quite a while ago I pinned this page on Pinterest: http://squashblossombabies.com/2012/01/19/toddler-scribble-art/

After trying one of these scribble art canvases I have to say I love the idea.  I will definitely make a few more to hang along with this one that I finished today.

I did a less complicated version of the instructions on the Squash Blossom Babies link so I'll explain my process.  I took a few scribble drawings (we have plenty these days):

I cut out shapes.  I used scissors not a knife like the original poster.  I had a spare black canvas from another Pinterest project that went bad.  I didn't paint the canvas.  I glued the shapes on.  I haven't coated it with anything yet.  I think I might hang it and use it as my tester to see how it holds up.  I don't want it to end up being sticky.  I'll update if I end up coating it or changing anything the second time around.  I love this idea and I think it will look really cute hanging up.  As the original poster commented, it's a great way to save some of the scribble drawings.  


Tuesday, August 7, 2012

footprint step stool

This post is a little different from our normal posts because M had little to do with this project.  I wanted to share it though because I think it came out really cute and it was easy to do.  Like a lot of other things, I found the idea on Pinterest.  I was searching for ideas for painting a step stool to put in M's bathroom.  M's bathroom has a monkey theme so originally I was looking for a monkey themed step stool but ended up deciding my freehand monkey painting skills were not quite up to par for that kind of project.  That led me to this idea:

It may not fit the monkey theme but it does match the colors in his bathroom.  Here is how I did it...

I started with an old step stool that has been around at my grandmother's house for a long time.  It was dark blue when we started.  Here is the before picture...

First step was painting it white.  I did two coats of white since it had started pretty dark and I didn't want the dark blue to show through the light blue I was planning to paint it.

The nice thing was that I did the whole project on our deck.  After each coat I let it sit in the sun, which allowed it to dry really quickly.  I was able to space the coats of white out during M's two naps yesterday.  Then later on at night I added the first coat of blue.  I did the second coat of blue this morning.

After lunch we added M's footprints and his name and the year.  I love how it came out and it looks great in his monkey bathroom.  It will end up being perfect for reaching the sink.