Friday, July 25, 2014

sand prints

I will preface this post by saying that, in my opinion, this idea sucks. You will not find instructions on how to make adorable sand footprints here because I failed at it 5, count them, 5 times. Don't get me wrong, those who have successfully done this have a beautiful little keepsake hanging on their wall. I would love for one of those moms to come to my house and make one of my childrens' feet. 

This is a photo of the best of my five attempts. It actually looks better in this photo than it does in person. 

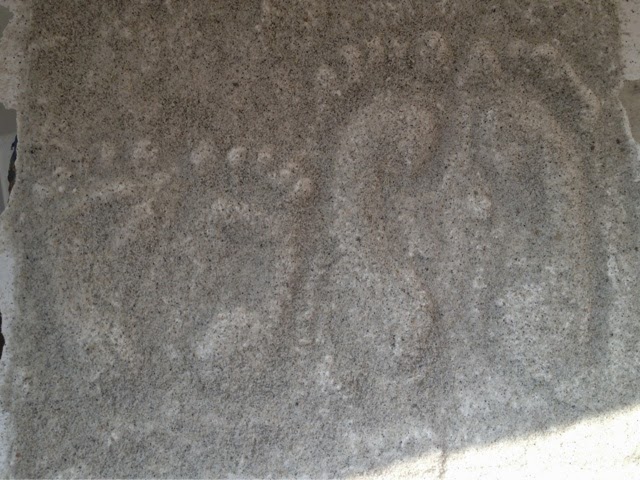
I had a number of problems over the course of five of these. I had cracked plaster, feet with no toes, sand that was too dry then sand that was too wet. I cannot tell you how to successfully do this but I will tell you the theoretical process. I will never, ever attempt this again so if you try it and are successful send me a note giving some hints and I'll post them. 

You need sand, plaster, a clear sealant spray, and a picture frame. 
Remove the glass from the picture frames and put the back of the frame in backwards. 
Fill the frame with sand and have your kid(s) make footprints. Here's a photo of that step. 

Smooth out the sand around the prints and cover in plaster. 
Let it dry completely then flip frame over carefully to remove plaster and sand. 
Brush excess sand off and spray with sealant. You can also add shells to make me really jealous. 

All in all, I wouldn't recommend this at all if the end result wasn't so cute. It's messy and the only interactive part for kids is making the footprint, which isn't much fun. I won't be trying it again but good luck to you if you try it!


Monday, July 7, 2014

ice bowl

Poor little G hasn't had much of a role on this blog yet. She's tried a lot of the infant activities M did at her age but to blog about them twice doesn't make much sense. This is a new variation on a few other things we've done (ice boats, ice painting, etc) and was great for a hot day. 
G was a bit more reserved about this than I expected. I gave her 4-5 colored ice cubes in a glass bowl of water. She batted at them, picked them up but quickly let them go, and splashed a bit. She also seemed to notice and watch the color melting off the cubes into the water. Needless to say this activity needs your undivided attention. G actually never tried putting the ice in her mouth but I was pretty shocked by that. 


On another note, I have labeled every (or close to it) blog entry with the age M or G was when we did it. You can easily search labels for a specific age if you'd like :)

chalk bombs

I think I've pinned this idea at least three times over the past year or so.  M was super excited and loved this so much.  Our chalk paint wasn't super bright but I'll explain that...

The idea of a chalk bomb is a water balloon filled with chalk paint.  There are a number of ways to make (or buy) chalk paint.  We made our by crushing chalk and adding water.  In theory it would have worked great because it was super bright and thick.  The trouble came with getting it into the balloons.  We only had super small balloons so that didn't make it any easier.  I attempted an eye dropper and a spray bottle but neither were forceful enough to get the balloon to expand and allow more than a little bit in.  I ended up filling it as far as I could then adding water.  It definitely diluted the "paint" but it still worked.  We had about 12 yellow, blue, and red bombs -

M loved throwing them.  He typically squeezes water balloons until they pop all over him so he needed some direction to throw away from him and he did well.  

Our paint wasn't super bright and was actually brighter once the splatters dried up.  This was really fun though and we will definitely be trying it again with better balloons and/or a better filling method.


windsock

M and I have made a windsock before using construction paper.  This windsock was different because we used a can as the base.  It made it a lot sturdier and allowed for M to gob on the paint.  We needed a summer-y/4th of July decoration and this was perfect.  We used a baby formula can as the base, peeled off the label and painted it with red, white, and blue paint.


Once it was dry we used a star-shaped sponge to make white stars around the can.  My intention was to use party streamers as the tails but, of course, there were no blue or red streamers to be found at Target that day.  We improvised with tissue paper cut in strips.  The shades were a bit darker, which ended up matching our half-mixed paint on the can pretty well.  Finally, I punched a hole in the top of the can and used a pipe cleaner to make a hook to attach the string to.  Happy 4th!


Tuesday, June 24, 2014

rocket party

Back in February my mother asked M what kind of birthday cake he was going to have when he turned 3.  He told her a rocket cake and stuck to it for the next four months.  It was a surprise to me because I would have guessed my truck-loving boy would have wanted some kind of elaborate truck cake (think street sweeper).  Anyway, it was through that request that M had a rocket-themed 3rd birthday party.

My favorite part of the party was the rocket invitations, a modified idea from Martha Stewart's website.  I'd like to eventually post the PDF so others can use the template.


Most of my decorations came from Oriental Trading and we loved their inflatable planets (hung over the table).  My favorite place to shop, the Target dollar aisle, provided rocket-like bubble favors.


Friday, April 18, 2014

water tracing

This is an activity stolen from first grade but one M likes a lot. We use our easel quite a bit and one side of it is a chalkboard.  I write letters on the chalkboard side and M traces/erases them with a foam paintbrush dipped in water.  M is pretty good at attempting a few tracings then he ends up washing the board but it's a fun activity for him with pretty simple set-up/clean-up if you have a chalkboard. 


easter art

I am very behind on this blog and I know there were some things I missed over the past few months.  Truth is, I'm happy to get this post up before Easter is actually over.  M and I have done a few little projects to get in the Easter spirit, which seemed to be a little overshadowed getting ready for G's baptism.

I love this bunny project because M loved it so much.  Of everything we've ever done, he was so proud of this bunny and asked me to take his picture with it when we were done.  The bunny head is a paper plate, covered in cotton balls.  M loved it because he spread the glue and stuck the cotton on with no help.  The ears are footprints and his bow tie is handprints.  Ideally we would have used googly eyes but drawn on did the trick this year -

Our second bunny is made out of a baby food jar, which we currently have a surplus of (any good baby food jar craft ideas?).  M filled it with cotton and we hot glued on some ears made of felt and pipe cleaners.  M has perched this guy up on our entertainment center so he can watch him.  

All M needs now are some colored eggs and he'll be ready for the real bunny...