Monday, December 31, 2012

truck paint

M loves vehicles of all kinds - cars, trucks, buses, trains, etc.  As I've mentioned here before, he also loves painting.  We combined the two today, as seen on a number of blogs I've looked at over the past year.

We started with M choosing the colors he wanted to use.  We're working on color names so it makes for good practice.  He chose five colors today and I put them on the paper in globs.  M dove right in.  In fact, the activity was really half truck and half finger painting for us.


After I showed him how to use the trucks to make tracks he got into it.  I put out two trucks that I knew would be easily cleaned off.  A lot of our other trucks were too big or were matchbox type so I thought they'd be more difficult to clean off.  These worked great but only gave us one type of tracks...


Our final project was a mix of finger paint smears and tire tracks.  


I imagine it would be a fun thing to do with plastic animals if you could find some with distinctive footprints.  M liked it but it ended up being kind of a quick activity.  I think if we had had more vehicles or animals or toys to make different tracks it would have lasted longer.  We did end up doing two sheets and then had fun giving the trucks a bath :)


Monday, December 10, 2012

Santa ornaments

These ornaments might be one of my favorite crafts we've done so far.  This is kind of a mom-activity since M really didn't have much of a part except for lending his hand for tracing.  However, I bet older kids could try the painting or at least mix the dough.

This is another salt dough activity.  We used salt dough once before.  You basically need one part salt to two parts flour and then about the same amount of water as salt.  For example:
2 cups flour
1 cups salt
1 cup water*
I ad the asterisk because I usually add the water gradually based on the consistency.  For this I only used a 1/2 cup of flour to a 1/4 cup of salt.  We ended up with three ornaments.

The first step is to trace your child's hand and then cut it out.

Mix the ingredients for the salt dough then knead it until it's mixed.  Roll it out flat and use a sharp knife to cut hands using the traced handprint.  I added the holes using a plastic straw:


Let them bake at a low temperature (we baked them at the lowest temperature our oven would go which was around 200 degrees) for one hour.  I flipped ours once so they baked for 30 minutes on each side.

After they come out paint them so that the four fingers are Santa's beard and the thumb is the long part of his hat.  Add a string to hang it:

I wrote M's name and the year on the back of each.  I want to put something on them to preserve them a bit better but I haven't yet.  This is a super cute gift that doesn't cost much to make.  You could even add little tags to the string.  


mix and pour

I loved this activity because the idea came from M.  Every year since I was little my mother and I have decorated a gingerbread house before Christmas.  This year was the first year M could participate.  We did a train instead of a house because he loves trains.  He got really into the decorating, which made it really fun.  However, during the course of the decorating he discovered that he could pour the little candies from one small dish to another (and then into the back of the train).  He ended up totally consumed with pouring the candy into different bowls.

And so we have this pouring and mixing activity....super easy to set up, one of M's favorites, and (maybe) the first independent activity we've had so far.

We started off like this with various bowls and measuring cups.  Some were filled with small snacks (we used Cheerios, banana puffs, and Goldfish).  Leave some empty.


Then M was let loose with them.  He poured and mixed and had lots of fun.  I started off playing with him but then I was able to clean the kitchen up a bit and load the dishwasher while he played quietly by himself.  He had a great time:


Here is my warning: If you don't want a mess of small snack foods on the floor, skip this one.  If my husband had been in the kitchen while we did this it wouldn't have lasted long.  However, we have a great clean up crew that ensured that no Cheerio or Goldfish stayed on the floor for longer than 2 seconds.


If When we do this one again I will give him a spoon to practice scooping.  If you have an older toddler you could get into mixing them together then sorting them back to the original bowls.  You could even use objects like buttons or pom poms or fruit loops if you want to stay edible, and get into sorting by color or size or shape, etc.  


toddler turkey

Back at Thanksgiving M and I made a few decorations to hang in our kitchen since we were hosting our first Thanksgiving.  M loves to use his paints so I gave him a piece of white construction paper and brush to paint with.  It came out looking like this:

Then I took it and cut it into feather-shaped pieces.  We created a turkey with his painted feathers:


We also did a handprint turkey that came out cute.  This was a Pinterest idea that I found.  When I saw it it was part of a handprint calendar that I'd love to try (each month is a handprint made into something different).  The hardest part was keeping him still while painting each finger a new color.  

My favorite part of these activities is a story I have to share because as much as this blog is for sharing ideas with others, it's also for me to be able to back at.  Before we started this activity I asked M if he wanted to paint.  He said, "paint, paint, paint."  I started getting everything out - his smock, his brush, the paint, etc. and setting it all up.  I lifted him into his seat (he was still saying, "paint, paint, paint") and he looked up at me and said, "happy."  Me too :)


Friday, November 16, 2012

baby autographed baseball

A quick post about the birthday gift M recently gave to his Papa. Papa is a big sports fan and has a number of autographed baseballs. M loves baseballs and likes seeing Papa's collection so for Papa's birthday M gave him a new ball to add to the collection.

The ball has his handprint on it in ink and his name and the year in ballpoint pen. Tip: do not try to use sharpie on a baseball. The ball came with a plastic case so it made a cute gift (and Papa loved it).

Friday, October 26, 2012

tape paint

It seems that with our new schedule Friday has become our activity day.  Today we tried tape painting. It was one of our most successful activities so far based on the amount of time we spent doing it and M's sadness at having to clean up.

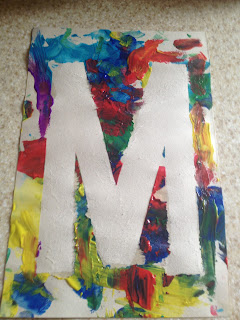
To tape paint you need tape, paint, and paper.  When I first read about it they suggested using finger paint.  We used a brush and it still came out well.  To start make a tape design on the paper.  Letters are easy.  Things with straight lines are easiest.  We did an M.

We used painter's tape and construction paper which turned out to not be the best combination but more on that later.  Once the tape is on you can start painting.  M loved painting today.  He painted the paper...

And I realized this child has had his hand painted for handprints too many times...

We talked a lot about colors while we painted.  M knows the words blue, green, and purple but isn't always right on when matching the words to the colors.  We did one color at a time and I let M choose which ones he wanted to use.  We set up the bottles and he either said what he wanted or pointed.  He was really into it.  Here's what it looked like when he finished:

After a while I peeled off the tape.  This is where the combination of painter's tape and construction paper kind of messed us up.  The painter's tape kind of stuck too much and pulled off some paper with it (if that makes sense).  I think next time Id either use masking tape with the construction paper or a stronger paper with the painter's tape.  It did come out cute though:

I've mentioned these paints before and I have to say how much I love them once again.  They were fabulous for this and wiped right off of M, his socks, his booster seat, and the plastic table cloth on our table.  Love them.


Friday, October 19, 2012

fall art

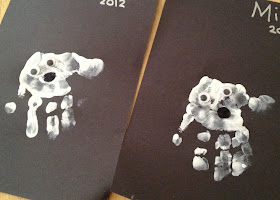
This morning M and I got into the Halloween spirit with this ghost handprint.


We made two, one to hang up and one to bring to M's great-grandmother.  I don't have any pictures of the process because I had one hand on the paint and the other on M's painted hand.  It's fairly simple.  You need white paint (we used our favorite very washable Crayola paint), black construction paper, and a black marker.  We used googly eyes but you could draw the eyes on.  M is getting good at handprints but if I was doing this with an older child I would tell them to keep their thumb down so it's closer to the other fingers.

Last week we did another fall picture that M loved (I haven't had a chance to post it).  I made a brown tree on construction paper:

M filled in the autumn leaves.  We used what I call "paint dotters" (bingo daubers, poster paint, felt tip paints, etc).  M loved these.  They were super easy for him to hold and use...

The downside was that they weren't very easy to clean off of his hands.  We needed SOS but it did come off.  Finished product...


Monday, October 1, 2012

miscellaneous fun

M's daddy was in Chicago this weekend for the Ryder Cup so we tried a few little quick activities over the course of the weekend.  Some were more successful/fun than others but I thought we'd post a bit about each.

Pipe Cleaner Strainer
I'd seen this idea on various blogs and websites I've visited.  You fill the holes of a strainer with pipe cleaners.  It's supposed to be fun to pull them out then try to put them back in.  I say "supposed to be fun" because M found the first part much more entertaining than the second.  He'd never used pipe cleaners before so he had a lot of fun taking them out and inspecting them.  He didn't have as much interest in trying to put them back in.  He found it much more fun to chase the dogs with them.

Sticker Collage
M's had a little experience with stickers in the past but I've never given him a whole sheet of them before.  Nonni brought us some pumpkin stickers so we used them to make a Happy Halloween sign.  At first M was mad when he stuck the stickers to the paper and couldn't get them back off but eventually he got the hang of it.  The trick at the beginning turned out to be providing him with a new sticker as soon as the first was on.  Here's our final product:

Color Sorting
This is my free version of this $30 activity.  M has started to recognize colors, especially when we color with crayons.  I set up three pieces of construction paper (yellow, blue, and red) and we used some of his magnetic letters of the same colors to sort.  M watched me do it then tried it:
To his credit he did do a few on his own.  However, the activity ended shortly after like this:

Card Books
This last one is another mom idea from Pinterest.  If you look for it you'll find a variety of ways to bind together greeting cards into keepsake books.  I am not one to hold on to cards.  I probably have less than 10 saved cards (for me) but I've kept every card M has gotten.  They've been in a box, which seems like a waste, so I took out his first birthday cards and the cards we received right after he was born and made two card books for him.  I found these small 3-ring binders at Staples, which worked great for the cards.  However, if there is such a thing as a small 3-hole punch, I don't have it.  So I ended use a single hole punch to put the cards into the binder.  It was a little more time consuming but it didn't take me more than an hour to make both books - and we had a lot of cards.
Before:
After:


Monday, September 24, 2012

rice bin

I don't know if it was this particular activity or the fact that M is getting older and more attentive but the rice bin was a huge hit.  I always leave the length of our activities up to M.  When he gets tired of something or decides to do something else we stop.  This was one of the first activities I had to drag him away from (literally).

Our rice bin was made up of a plastic bin, a 5 pound bag of rice, and miscellaneous plastic toys and containers.  We played on a trash bag cut so it would lay flat.

We had a little spill over onto the floor but it was easily cleaned up.  One of the things M liked doing the most was filling up a small tupperware cup and dumping it back into the bin.

The container I used has a snap on lid so I'm hoping we can reuse the rice bin multiple times.  In the future I might add something to it, like lentil beans or small pieces of pasta, to change the textures.  If our little plastic pool had still been out I think I would have put the rice bin in the pool, which would have made for super fast and easy clean up.  I'll also add different toys since M really enjoyed "digging them up."

Some things we used were plastic building blocks, plastic toy figures, small plastic cups, magnetic letters, and some old baby links that we haven't used in quite a while.  Other things that might be good- measuring cups, measuring spoons, little trucks to drive through the rice (M would love that), buttons, rocks, Easter eggs, cooking utensils, etc.  You can also use food coloring to change the color of the rice (be sure to let it dry) and I think you might even be able to buy colored rice at some places.  This was similar to our cornmeal beach and jello bowl activities that we tried months ago.  I love these types of hands on sensory activities because M loves exploring so much.  You can do this type of "sensory bin" with a variety of things - jello, cornmeal, rice, beans, shaving cream, soapy water, confetti, macaroni, ice (great for a hot day), etc.  It's fun and easy and toddlers love it!


Friday, August 31, 2012

water painting

I was planning to save this idea for next week but with today's warm weather I decided we'd try it. We've painted a few different ways now. M has used a paintbrush before (see our garden pets entry). Water painting was a great way to let him practice more with a paintbrush and to cool off a little in the warm weather.
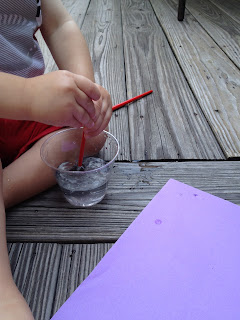
We used water, a few paintbrushes, and construction paper for this activity. Basically M "painted" the construction paper with the water instead of paint.  For the first 10 minutes M was happy to stir the water with his brush.

Once he got the hang of it he had fun.  We even made some hand prints after M stuck his hand in the cup.  He made a lot of dots and splatters.

The neat thing was the construction paper held up to a lot of water.  Even when the cup was dumped on one piece.

I'll admit I failed at this project in the beginning.  We first tried this on our porch (bad idea, wet carpet) with a rather full cup of water (um, not sure what I was thinking).  Much better out on the deck with a half-full cup.  It was plenty of water until it got dumped.  However, I think the dumping just made it more fun for M.  You can do this on pavement or wood surfaces too - basically anywhere that water will show up darker.  


Thursday, August 30, 2012

cloud dough

I have seen cloud dough on a number of blogs/websites since I began looking for activities a few months ago.  We tried it today and I can see why so many people have used it.  It has definitely become one of our new favorites.  We played outside today since the weather was so nice but I could see this being an awesome indoor activity when the weather is cold.  The common cloud dough recipe I found was:
- 1 cup of baby oil
- 8 cups of flour

8 cups of flour seemed like kind of a large amount to me for just M to play with so we made a half batch (1/2 cup of baby oil and 4 cups of flour).  This amount seemed to be just right for us today but I can see why the larger amounts would come in handy with more children.  I mixed it with my hands like kneading bread dough.  It mixed fairly quickly.

There were so many reasons why we loved cloud dough.  First of all, it feels really neat, which makes for an enjoyable sensory experience :)  It looks crumbly and grainy like sand but feels soft like flour.  It molds really easily.  It's not messy at all and easy to clean up - either toss it or save it in an airtight container.

Most of the places I read about cloud dough used a plastic basin for playing.  I put ours on a cookie sheet because I felt like it was less restrictive, plus we were outside and I had the luxury of just hosing down the patio when we finished.  If we were doing this indoors I would definitely use something with sides and I'd probably put him on newspaper or a plastic table cloth or something like that.  We used some of our sand table toys to play but for the most part I think M enjoyed using his hands.


And for easy baby/toy clean up...our water table:


Tuesday, August 21, 2012

hot wheels lamp

I've needed a lamp for M's room for a while but I haven't been able to find anything just right.  His room started with a bear theme.  As he's accumulated more stuff it's turned into a bear room with trains and sports and dogs and all kinds of other boy things.  At first I was looking for something that either had a bear on it or went with the mostly red/brown/beige colors in his room.  I widened my search and still didn't find anything I liked so I turned to Pinterest.  I've been trying a lot of DIY ideas from Pinterest lately and found some cute lamp ideas.  I decided to go with this one since M loves trucks and cars.  This would be an awesome project to do with a boy in first or second grade as a fun measuring activity.  I did our version slightly different from the original:


I went to Target and bought the lamp with the black shade and the matchbox cars.  We had some yellow felt left over from our felt board project.

I cut the yellow felt into one-inch strips and placed them one-inch apart on the lamp shade.  Our lamp shade was 28-inches around.  I attached them with hot glue.  

The cars were more difficult to attach.  At first I put hot glue on each wheel and stuck them on.  It didn't hold so I tried coating the whole bottom of the car in hot glue.  I held each car on for about a minute.  This seemed to work well.  There was one orange race car with a thin bottom that was more difficult than the others but eventually it stayed.  

I realize our blog has been missing a lot of "activity" type posts lately.  I have a few things planned that we'll try and share here soon.  But I love these projects and want to share them too!

Wednesday, August 15, 2012

scribble art canvases

Quite a while ago I pinned this page on Pinterest: http://squashblossombabies.com/2012/01/19/toddler-scribble-art/

After trying one of these scribble art canvases I have to say I love the idea.  I will definitely make a few more to hang along with this one that I finished today.

I did a less complicated version of the instructions on the Squash Blossom Babies link so I'll explain my process.  I took a few scribble drawings (we have plenty these days):

I cut out shapes.  I used scissors not a knife like the original poster.  I had a spare black canvas from another Pinterest project that went bad.  I didn't paint the canvas.  I glued the shapes on.  I haven't coated it with anything yet.  I think I might hang it and use it as my tester to see how it holds up.  I don't want it to end up being sticky.  I'll update if I end up coating it or changing anything the second time around.  I love this idea and I think it will look really cute hanging up.  As the original poster commented, it's a great way to save some of the scribble drawings.  


Tuesday, August 14, 2012

smoosh painting

This is a relatively quick and clean art activity.  Our finished smoosh paintings came out colorful and cute but M lost interest in this pretty quickly so we didn't cover the entire shapes.

I think this would be great with two or three year old who could appreciate the mixing colors.  Materials you need: paint, large ziploc bags (make sure they have a good zip), and paper shapes.  We used construction paper.
Put one shape in a bag with some paint.  We used two colors at a time because I could see putting all the colors in and having just turn brownish.  I put a good glob of each color but in retrospect I would add more paint.  Zip up the bag and get smooshing....
Here are before and after shots:


We did this project on the floor and M used his hands and feet to smoosh.  I would recommend trying to take the paper out of the bag as soon as you're done.  I ended up leaving our second one in a little longer and it was kind of stuck to the bag.  The best part of this activity was that there was virtually no clean up.  M did this in his whitest shirt and all I did at the end was throw the bags away.  Loved that part of it!


Tuesday, August 7, 2012

footprint step stool

This post is a little different from our normal posts because M had little to do with this project.  I wanted to share it though because I think it came out really cute and it was easy to do.  Like a lot of other things, I found the idea on Pinterest.  I was searching for ideas for painting a step stool to put in M's bathroom.  M's bathroom has a monkey theme so originally I was looking for a monkey themed step stool but ended up deciding my freehand monkey painting skills were not quite up to par for that kind of project.  That led me to this idea:

It may not fit the monkey theme but it does match the colors in his bathroom.  Here is how I did it...

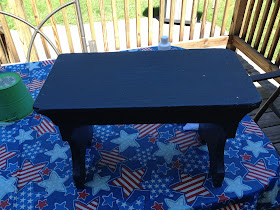
I started with an old step stool that has been around at my grandmother's house for a long time.  It was dark blue when we started.  Here is the before picture...

First step was painting it white.  I did two coats of white since it had started pretty dark and I didn't want the dark blue to show through the light blue I was planning to paint it.

The nice thing was that I did the whole project on our deck.  After each coat I let it sit in the sun, which allowed it to dry really quickly.  I was able to space the coats of white out during M's two naps yesterday.  Then later on at night I added the first coat of blue.  I did the second coat of blue this morning.

After lunch we added M's footprints and his name and the year.  I love how it came out and it looks great in his monkey bathroom.  It will end up being perfect for reaching the sink.